Please note all reference to 'drivers' and 'passengers' sides refer to UK right hand drive vehilcles.
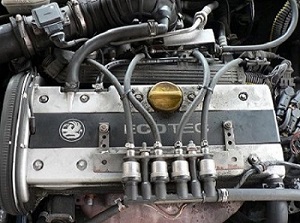
The under bonnet view of my Vauxhall Vectra 2.0 ltr.
Note: - This car has been converted to LPG, which I would recommend to anyone. Please note the position of the extra pipe work on my car to avoid confusion on yours!
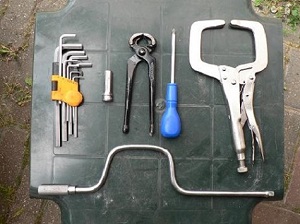
You will need the following tools: -
6mm Allen wrench.
10mm deep socket (3/8th inch drive).
Both a cross-head and flat blade screw driver.
Pliers to release the pipe work spring clips.
Kitchen roll or clean rags.
Old paint brush 0.5" to 1" to clean throttle body.
Carburettor cleaner.
1mm and 3mm drills.

Remove the clip retaining the throttle cable outer into the bracket.
Pull the cable outer back through towards the passenger side and once clear of the grommet, ease the grommet out of the bracket using a large flat bladed screwdriver, to avoid tearing the grommet.
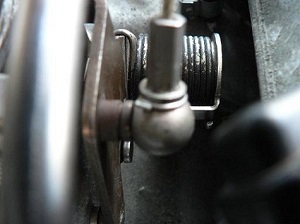
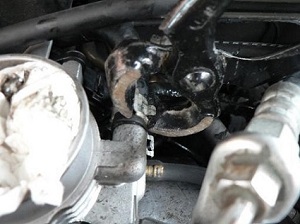
With the throttle cable swung up, as you can see above, it is easier to deal with the ball joint retaining clip.
At 7 o'clock when viewed from above, is the tag end of the clip, which needs to be prised away from the shaft it is wrapped around. Once free of the shaft, the clip can be moved in the direction of the throttle cable to withdraw it. Do NOT drop it!
Here the clip is shown ready to be pulled free of the ball joint. The shaft of the clip passes into the ball joint at the 10 o'clock position of the clip as shown in the image above.
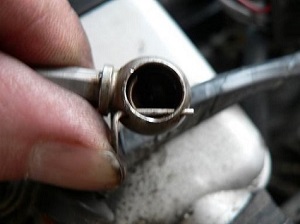
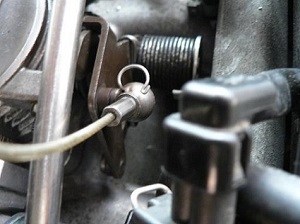
The image above shows clearly how the spring clip retains the throttle cable end onto the ball joint.
On the left hand side you can just see the inside the ball socket is another retaining spring wire.
With the clip removed, the ball joint can now be prised off using a screwdriver. A little force is required. This is normal.
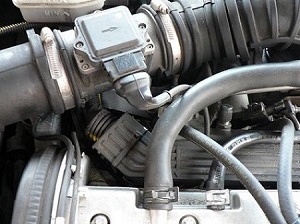
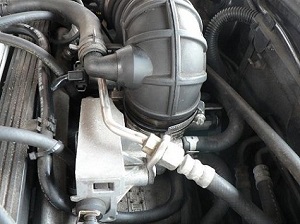
Disconnect the right hand side of the air inlet shown above, at both ends. Leaving the air flow meter in place.
It would be prudent to stick some kitchen roll down the throttle body air intake to stop anything falling in.
Disconnect the breather hoses. I managed to undo this clip with the nail pliers shown above. I had to resort to the welding clamp to do the big one though.
The big breather hose also had the consistency of chewed liquorish. So that will get replaced at some point.
Disconnect the vacuum hose at the back of the throttle body, on the driver's side. Note the main body of the Idle Control Valve shown at bottom left and kitchen roll gently stuffed into the throttle body intake.
Disconnect the Idle Control Valve wiring harness at the front driver's side and the Throttle Position Sensor wiring harness at the back of the throttle body.
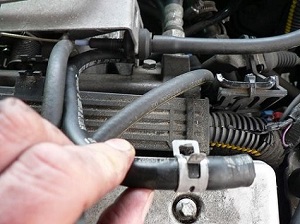
Remove the retaining clips and disconnect both water pipes. Note which goes where.
Most sites I have read seem to insist that you undo the fuel line with a 17mm spanner. No-one actually asks you to relieve the pressure in the system first, by way of the Schrader valve located at top left of the above image. Not a good idea. They also omit to tell you to undo the other end of the metal fuel line at the fuel injection rail! Either way, I didn't find I needed to.
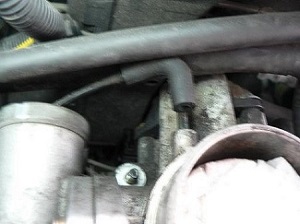
I found it just as easy and far less risky to undo the two 6mm Allan screws that hold the fuel line bracket to the side of the throttle body. That done, the fuel line can remain connected and in place. (Water pipes and air intake shown still connected in this image).
Undo the four 10mm nuts which retain the Throttle Body to the inlet manifold. A tip is to stuff a bit of kitchen tissue down the sides of the socket to help jam the nut into the end, it may stop you from dropping it down the back of the engine.
Seal the intake body with clean kitchen roll or rags.
Once removed, clean the throttle body with a brush and carburettor cleaner.
The Idle Control Valve can either be cleaned, or as I did, replaced with a pattern part from the web.
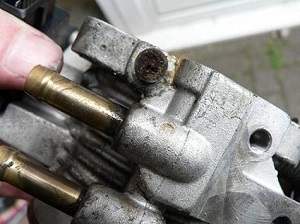
In my case, I had to remove the built up grime in the blocked breather by gently drilling the muck out BY HAND! Check frequently to ensure you are not drilling out any aluminium. Use a 3mm drill to clean the brass outside vent and a 1mm drill to clean the opening inside. Once the tube is reasonably clean, squirt carburettor cleaner down to get the rest of the muck out.
I used a foot pump connected to the brass connector to ensure the breather was working before re-fitting.
Re-assembly is much the same in reverse.
Remember to remove all rag or kitchen roll and do NOT over-tighten the nuts on the throttle body flange or you will induce air leaks.
Check for any water, air and fuel leaks. All being well your Vectra will idle at junctions and behave its self once again.
Last updated: 21/06/2020
All pages created with Notepad++ unless otherwise stated.